
筆記網站
筆記網站
# 專案結構
tree /f > structure.txt |
vue-project | |
│ .gitignore | |
│ env.d.ts | |
│ index.html | |
│ output.txt | |
│ package-lock.json | |
│ package.json | |
│ README.md | |
│ tsconfig.app.json | |
│ tsconfig.json | |
│ tsconfig.node.json | |
│ vite.config.ts | |
│ | |
├─.vscode | |
│ extensions.json | |
│ | |
├─public | |
│ favicon.ico | |
│ | |
└─src | |
│ App.vue | |
│ main.ts | |
│ | |
├─assets | |
│ base.css | |
│ logo.svg | |
│ main.css | |
│ | |
└─components | |
│ HelloWorld.vue | |
│ | |
└─icons | |
IconCommunity.vue |
public:這個資料夾包含了所有發布的靜態檔案,這些檔案在建置過程不會經過 Webpack 加工。(但是有一個例外:index.html會有一些處理)。favicon.ico:這是應用程式的 favicon。目前是 Vue 的標誌。
index.html:這是應用程式的模板。你的 Vue 應用程式會透過這個 HTML 頁面來運行,你也可以使用 lodash 樣板語言在這個頁面穿插一些值。src:這個資料夾是 Vue 專案的核心。main.js:這是應用程式的進入點。目前,這個檔案會初始化你的 Vue 應用程式並定義要將應用掛載到 index.html 檔案中的哪個 HTML 元素。通常還會在這個檔案註冊全域性元件或載入其他 Vue 函式庫。App.vue:這是 Vue 應用程式的根節點元件。往下看可以了解更多關於 Vue 元件的說明。components:你可以把你的元件放在這個資料夾。目前它只有放一個範例元件。assets:這個資料夾是用來放一些靜態檔案像是 CSS 和圖片。因為這些檔案在來源目錄下,它們可以透過 Webpack 加工處理。這表示你可以使用一些預處理器,像是 Sass / SCSS 或是 Stylus 。
# Web 元件化系統
Vue.js 嚮往的就是先建立好根實體 (Vue Instance),再開發好底下每個小元件 (Components),慢慢往上組合成一個完整頁面,最後全部搭建起來成為一個完整專案。

通常一個元件包含 html、css、js,而 Vue 會將其全部寫在一個 .vue 為副檔名的檔案當中,vue-loader 會編譯這個 .vue 的檔案,將結果顯示出來。
# Vue Instance
根實體 (Vue Instance) 是樹狀結構中最上面的那個點。
每個 Vue App 都是從創建一個 vue instance 開始,Vue Instance 是透過 Vue Constructor (建構式) 所產生。
在實體化時,可傳入一個選項物件 (Options),此物件包含這個 vue instance 需要用到的屬性,像是掛載點 (el)、資料 (data)、方法 (methods)、模板 (template)、** 生命週期鉤子 (hooks)** 等等。
var vm = new Vue ({ | |
// options | |
}) |

# .vue 檔案(單一檔案元件)
Vue 讓你把模板、相關指令碼和 CSS 整合在一起放在以 .vue 結尾的檔案裡。這些檔案會被 JS 的打包工具(像是 Webpack )加以處理,這也代表你可以在你的專案裡使用一些建置工具,像是 Babel 、 TypeScript 、 SCSS 等工具來創造更複雜的元件。
# App.vue
在創建專案時,你可以在 src 資料夾中,看到第一個 .vue 檔案。
由三個部分組成: <template> 、 <script> 以及 <style> ,分別包含了元件的模板、指令碼和樣式資訊。
所有的單一檔案元件都是使用這種基本架構。
<script setup lang="ts"> | |
{/* javascript */} | |
import HelloWorld from './components/HelloWorld.vue' | |
import TheWelcome from './components/TheWelcome.vue' | |
</script> | |
<template> | |
{/* html */} | |
<header> | |
<img alt="Vue logo" class="logo" src="./assets/logo.svg" width="125" height="125" /> | |
<div class="wrapper"> | |
<HelloWorld msg="You did it!" /> | |
</div> | |
</header> | |
<main> | |
<TheWelcome /> | |
</main> | |
</template> | |
<style scoped> | |
{/* css */} | |
header { | |
line-height: 1.5; | |
} | |
.logo { | |
display: block; | |
margin: 0 auto 2rem; | |
} | |
</style> |
<template>元件的模板:- 包含所有的標記結構以及元件的呈現邏輯。
- 模板可以包含任何有效的 HTML,以及一些 Vue 特定的語法。
- 在
<template>標籤上設定lang屬性。例如設置<template lang="pug">,你就可以使用 Pug 樣板語法來取代標準的 HTML 。在本教學中我們會使用標準 HTML ,但還是值得知道有這個方法。
<script>指令碼:- 包含元件中所有非顯示的邏輯。最重要的是,
<script>標籤必須輸出一個 JS 物件。 - 這個物件是在本地端註冊的元件,包含定義屬性、處理本地狀態、定義方法等等。
- 如果想要使用 TypeScript 語法,必須把
<script>標籤的lang屬性設定成<script lang="ts">來告訴編譯器你要使用 TypeScript 。
- 包含元件中所有非顯示的邏輯。最重要的是,
<style>樣式:- 是撰寫元件的 CSS 的地方。
- 如果加上
scoped屬性,例如<style scoped>, Vue 會把樣式的範圍限制在這個單一檔案元件裡。這類似 CSS-in-JS 的解決方案,但是它允許你寫單純的 CSS 。 - 如果在使用 CLI 創建專案時有選擇 CSS 預處理器,就可以在
<style>標籤上添加lang屬性,這些內容在建置的時候將會被 Webpack 處理。舉例來說,<style lang="scss">允許在樣式資訊中使用 SCSS 語法。
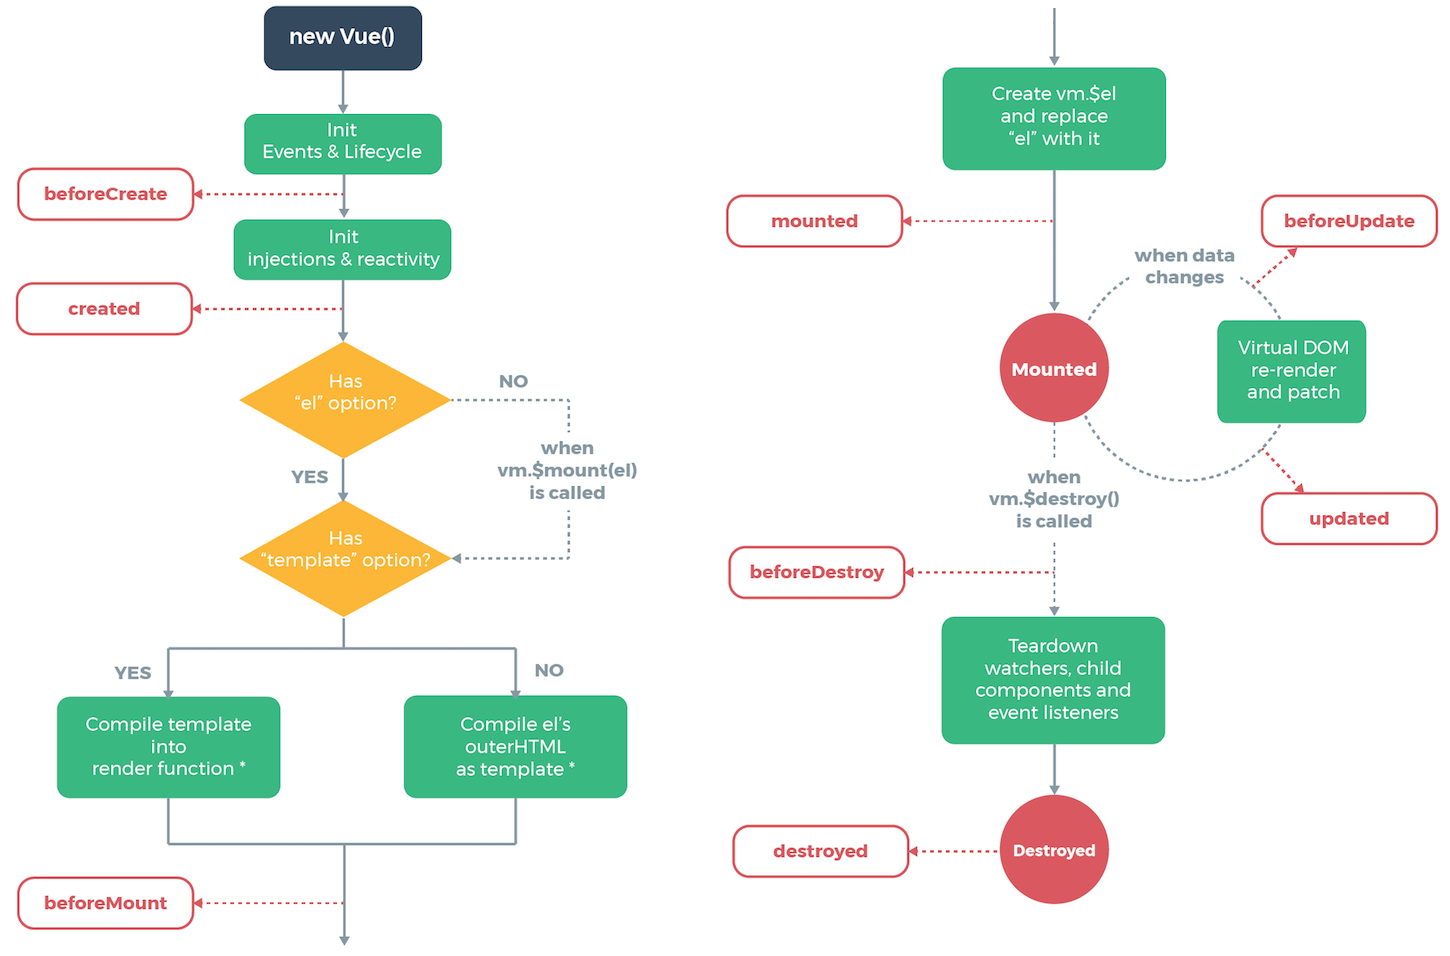
# Lifecycle Hooks
這 8 個 hook 的資料型態皆為 function:
- beforeCreate
- 在初始化 vue instance 並開啟整個 Lifecycle 後,資料綁定與事件配置之前。
- 目前階段還無法調用
$data。 - 應用場景:loading 進頁面的事件
- created
- vue instance 創建完成
$data已可以取得,屬性與事件也已綁定好。- 目前階段尚未掛載
el,DOM 也尚未生成。
- beforeMount
- 在掛載
el開始之前。 - 目前階段是相關 render 函式首次被調用,尚未被 DOM 給綁定。
- 在掛載
- mounted
el被剛創建好的vm.$el替換取代,並且掛載到vm上。- 目前階段已被 DOM 綁定。
- 應用場景:對後端發出請求或讀取新資料
- beforeUpdate
- 在資料更新時調用,Virtual DOM 重新 render 與 patch 之前,可以在這個階段變更資料狀態。
- 目前階段還不會繪製 view。
- updated
- 資料更新後會使 Virtual DOM 重新 render 頁面。
- 目前階段會繪製出正確的 view。
- beforeDestroy
- 在 vue instance 被銷毀前調用。
- 目前階段還可以完全使用這個 vue instance。
- destroyed
- vue instance 銷毀後可以調用
- 調用後這個 vue instance 底下的資料與樣板會解除綁定,事件會取消監聽,所有子元件也會被銷毀。
# Example
var vm = new Vue({ | |
data: { | |
name: 'Eva', | |
}, | |
beforeCreate: function() { | |
//vue instance 尚未創建完成,還不能讀取到資料 | |
console.log('beforeCreate: My name is ' + this.name); | |
}, | |
created: function() { | |
//vue instance 創建完成,資料已綁定 | |
console.log('created: My name is ' + this.name); | |
}, | |
beforeMount: function() { | |
// 尚未掛載 el 與綁定 DOM | |
console.log('beforeMount: My name is ' + this.name); | |
}, | |
mounted: function() { | |
// 綁定 DOM 之後 | |
console.log('mounted: My name is ' + this.name); | |
}, | |
beforeUpdate: function() { | |
// 資料更新時調用,尚未更新 DOM | |
console.log('beforeUpdate: My name is ' + this.name); | |
}, | |
updated: function() { | |
// 因為資料更新而更新 DOM | |
console.log('updated: My name is ' + this.name); | |
}, | |
beforeDestroy: function() { | |
// 銷毀整個 vue instance 之前 | |
console.log('beforeDestroy'); | |
}, | |
destroyed: function() { | |
// 銷毀整個 vue instance 之後 | |
console.log('destroyed'); | |
}, | |
}); |
# 第一階段:beforeCreate /created
在綁定 el 之前,beforeCreate 階段還不能讀取資料
# 第二階段:beforeMount /mounted
加入 el 屬性在物件裡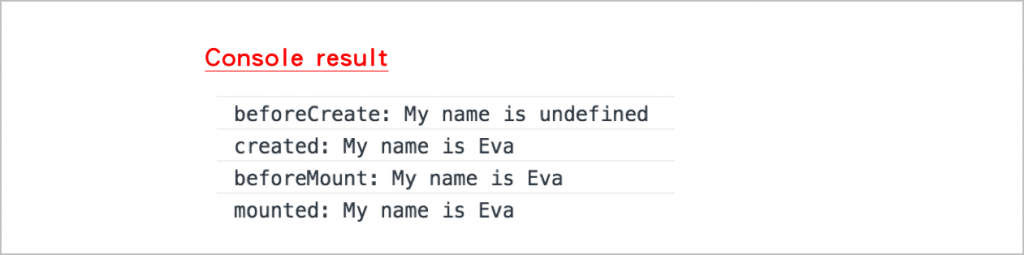
# 第三階段:beforeUpdate /updated
因為要變更資料才會觸發這兩個 function,這邊我們使用強制變更資料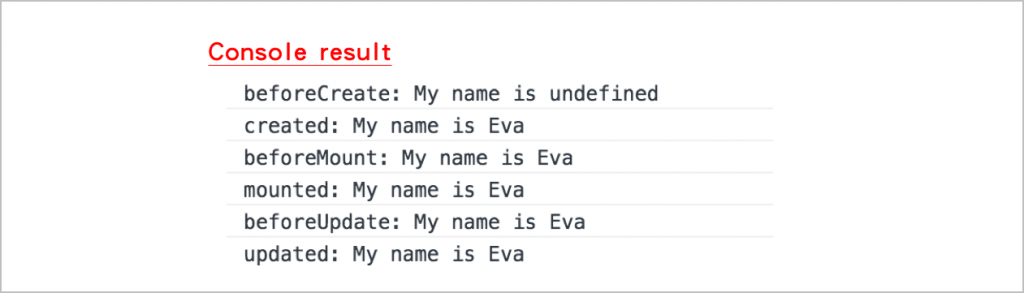
# 第四階段:beforeDestroy /destroyed
因為上面第三階段強制變更資料的方法會導致一直執行更新資料,所以先將剛剛新增的 vm.$beforeUpdate(); 刪掉,加入 destroy 的方法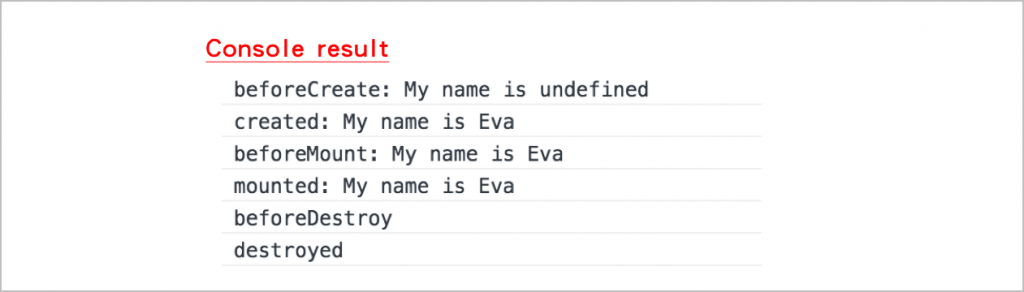
# 參考 / 學習文章
- 官方文件
- w3school
- 維基百科
- MDN web docs
- Vue.js 30 天隨身包系列